

I wanted an email address on one of my own domains, but, frankly, I didn’t want to pay for it.
Cloudflare Email Routing and a regular Gmail account work pretty well together for this. Getting mail into Gmail was easy. However, sending from the same custom address and ensuring I could be a proper email citizen was where I ran into snags.
I started with Google’s SMTP server because it was already there. The From address worked with successful mail delivery, and since I had Gmail already, it was easy to route to my existing inbox.
Then I checked the headers.
SPF and DKIM passed for Google, but DMARC failed for my domain. The visible From address was mine; the domains doing the actual authentication were Google’s. That looked good enough in the inbox, but the authentication did not properly align with the domain in the From address.
This made me dig deeper and realize I can’t get proper DMARC to pass this way. I needed another option, and I didn’t want to pay for something I am just having fun playing around with.
Why does this matter? SPF identifies which servers are allowed to send mail for a domain, DKIM adds a signature that proves the message was not changed in transit, and DMARC checks that those results align with the address people actually see in the From field. Together, they make it harder for someone to spoof your domain and give receiving mail servers more reason to trust your messages. Since I definitely didn’t want my domains being used for SPAM, this seemed like an obvious choice to set all this up.
How This Free Custom Domain Email Setup Works
Cloudflare Email Routing receives mail addressed to you@yourdomain.com and forwards it to an email address you already own. It is not a mailbox: there is no separate inbox, storage, or webmail interface.
The complete setup looks like this:
- Incoming mail: Cloudflare Email Routing receives mail for your domain
- Inbox: Cloudflare forwards that mail to Gmail
- Outgoing option 1: Gmail sends through Google’s SMTP server
- Outgoing option 2: Gmail sends through SMTP2GO with aligned SPF and DKIM
Google SMTP or SMTP2GO?
Both options let you use Gmail to compose messages from your custom address. The difference is how the outgoing mail is authenticated.
| Google SMTP | SMTP2GO | |
|---|---|---|
| Additional account | No | Yes |
| Custom From address | Yes | Yes |
| Custom-domain SPF and DKIM alignment | Not in this consumer Gmail setup | Yes, with a verified sender domain |
| DMARC alignment | Fail | Pass |
| Best fit | Occasional personal mail | Authenticated outbound mail |
| Main tradeoff | Your Gmail address may be visible | Free-plan sending limits |
Gmail’s Send mail as feature lets you choose you@yourdomain.com in the From field with either outgoing option.
That gives us a useful two-way address without hosting a mail server. It is a nice fit for a personal domain, homelab alerts, or a side project. Cloudflare remains the inbound service in both versions. Your domain’s MX records tell other mail servers where to deliver incoming messages, while the SMTP setting in Gmail controls outgoing mail. Changing one does not affect the other.
Before You Start
You will need:
- A registered domain using Cloudflare DNS
- A Gmail account
- Two-Step Verification enabled on that Google account if you plan to use Google SMTP
- Access to Google app passwords if you plan to use Google SMTP
- A free SMTP2GO account if you want aligned outbound authentication
If you want to use Google SMTP, check for app passwords before doing anything else. Google does not offer them on every account. They may be unavailable on managed work or school accounts, accounts enrolled in Advanced Protection, or accounts that use security keys exclusively for Two-Step Verification.
Set Up Cloudflare Email Routing
Enable Email Routing
In the Cloudflare dashboard, go to Compute > Email Service > Email Routing. If Email Routing is not already enabled, follow the setup prompt and allow Cloudflare to add the required DNS records.
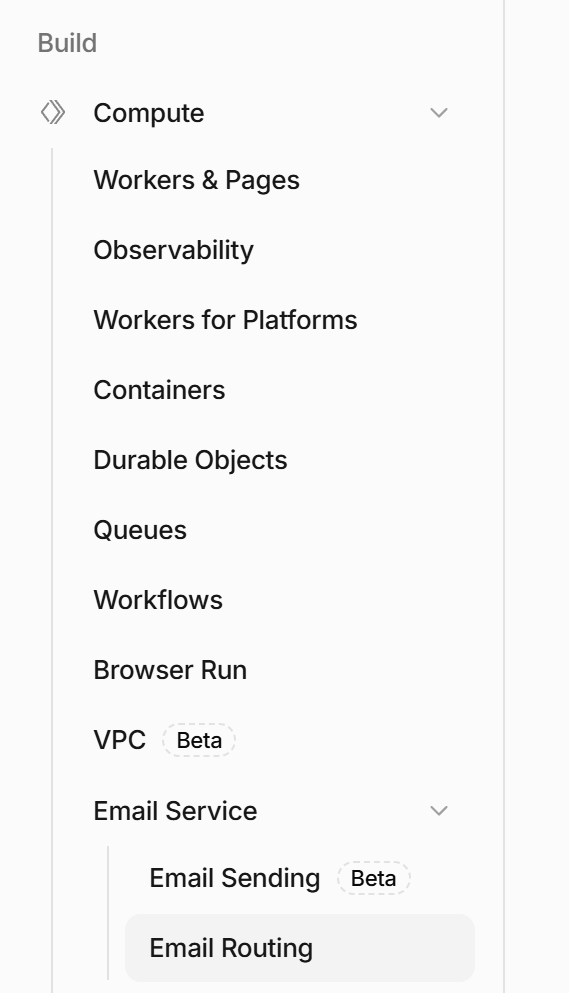
Email Routing is under Compute > Email Service in the current Cloudflare dashboard.
Cloudflare will offer to add the required records. Let it do that unless you already have mail records that need to be preserved. The current setup includes three MX records plus SPF and DKIM TXT records. The important parts look like this:
MX   @   route1.mx.cloudflare.net
MX   @   route2.mx.cloudflare.net
MX   @   route3.mx.cloudflare.net
TXT  @   "v=spf1 include:_spf.mx.cloudflare.net ~all"
TXT  cf2024-1._domainkey   "v=DKIM1; ..."
Cloudflare assigns the MX priorities automatically. I would leave those values, along with the DKIM value, exactly as Cloudflare provides them.
The cover image shows the Email Routing records in my Cloudflare DNS zone. The Google SPF include shown there is part of my existing configuration; it does not, by itself, prove DMARC alignment.
If the domain already has an SPF record, do not add a second one. SPF expects one record at the domain, so any required mechanisms need to be merged into that record. Also keep in mind that SPF has a limit of ten DNS lookups; blindly adding include: entries can create another problem.
Fun fact, some entries can expand out to multiple DNS lookups. So even if you add what you think is one entry, it may expand out to many more, exceeding the 10 DNS lookup maximum. Simply search for an SPF validator, there are many free tools on the net that can help you here.
Verify the Destination Address
Open Destination Addresses, add the Gmail address that should receive the forwarded mail, and complete the verification email Cloudflare sends.
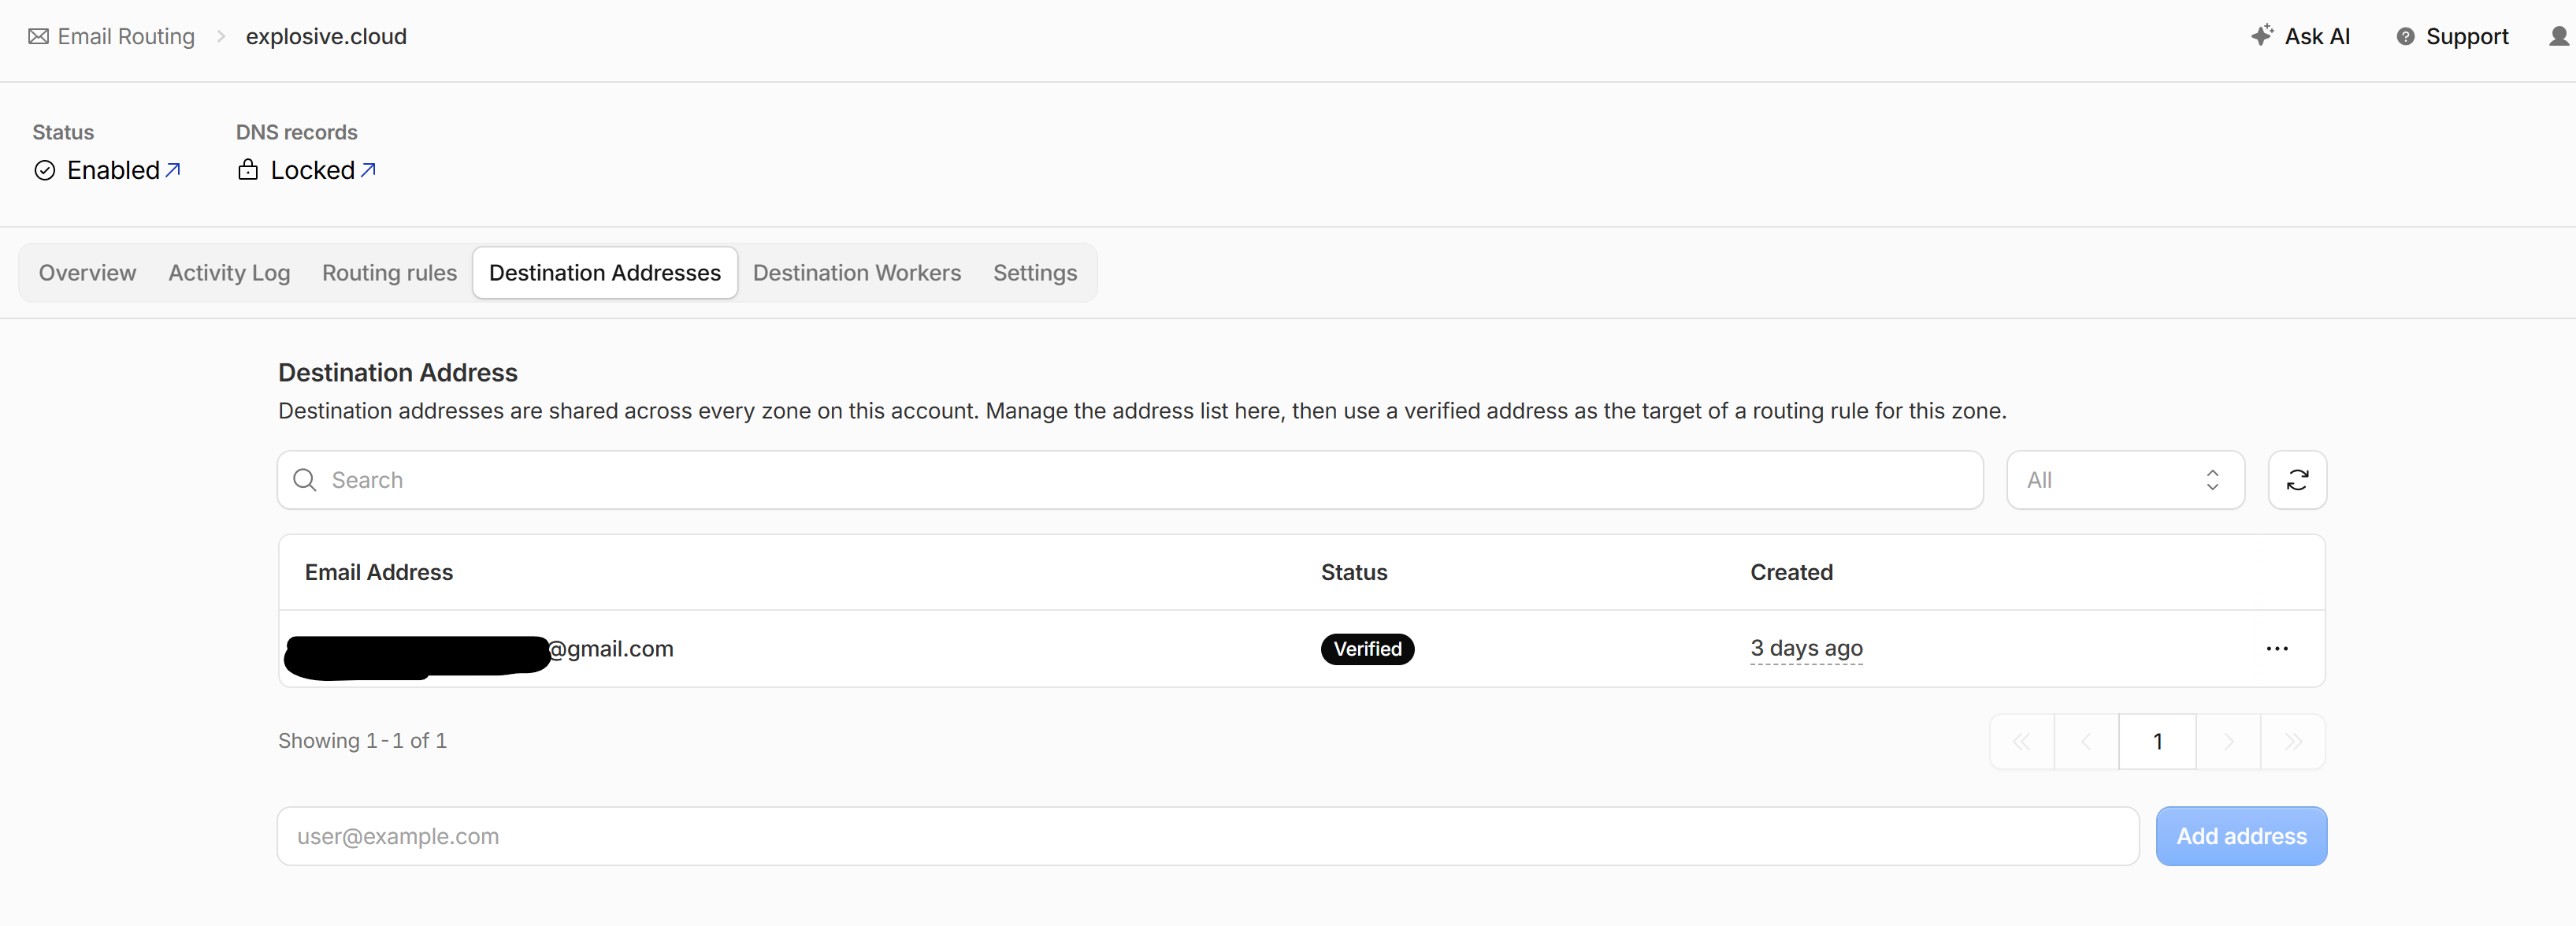
The Gmail destination must show as Verified before it can receive routed mail.
I like using Gmail plus-addressing here, such as yourname+yourdomain@gmail.com. It still lands in the same Gmail inbox, but it gives you an easy value to use in filters and labels.
Make sure Cloudflare shows the destination as Verified before continuing.
Create a Routing Rule
Open Routing Rules and create a rule for the address you want:
- Custom address:
hello@yourdomain.com - Action: Send to an email
- Destination: Your verified Gmail address
Repeat that for any other addresses you need.
Cloudflare also has a catch-all rule. If you enable it, anything sent to your domain will be forwarded, including made-up or misspelled addresses. That can be useful when I want to hand a unique address to every service, but it also gives spammers a much larger target. I normally prefer explicit rules unless I have a reason to use catch-all.
Test Incoming Mail
Send a message from an outside account to the new address. It will often arrive quickly, but Cloudflare notes that DNS changes can take longer to propagate.
If it does not arrive, check these first:
- The destination address shows Verified
- The routing rule is active
- The domain’s MX records point to Cloudflare
- Cloudflare shows the domain as properly configured
At this point, incoming mail works. Now we need Gmail to send from the same address.
Option 1: Use Google SMTP (Simple, But DMARC-Limited)
This is the easiest path. If you just want to receive email and send the odd message, this does the trick. You do not need another provider, but I would keep DMARC in monitoring mode until you understand the tradeoff below.
Create an App Password
Do not use your normal Google password for SMTP.
Open your Google Account, go to Security, and create an app password. Give it a useful name and copy the 16-character password when Google displays it. Google only shows it once.
Add the Address to Gmail
In Gmail, open Settings > See all settings > Accounts and Import. Under Send mail as, select Add another email address.
Enter the display name and custom address, such as hello@yourdomain.com. I leave Treat as an alias enabled because this address belongs to me.
On the SMTP screen, use:
SMTP server: smtp.gmail.com
Port:        587
Username:    yourname@gmail.com
Password:    your 16-character app password
Security:    TLS
The username is the normal Gmail address. If you used a plus-address for the Cloudflare destination, do not use that plus-address as the SMTP username.
Google will send a verification message to the custom address. Cloudflare forwards it to Gmail, where you can open the message and confirm the address.
Google documents one privacy limitation here: some recipients, particularly those using Outlook or another mail service, may see your Gmail address shown as being “on behalf of” the custom address. Automated replies and mailbox-full notices can also expose the original Gmail address.
Fix the Reply Behaviour
Still under Accounts and Import, set When replying to a message to Reply from the same address the message was sent to.
Otherwise, it is very easy to receive a message at hello@yourdomain.com, hit Reply, and accidentally send the response from your personal Gmail address.
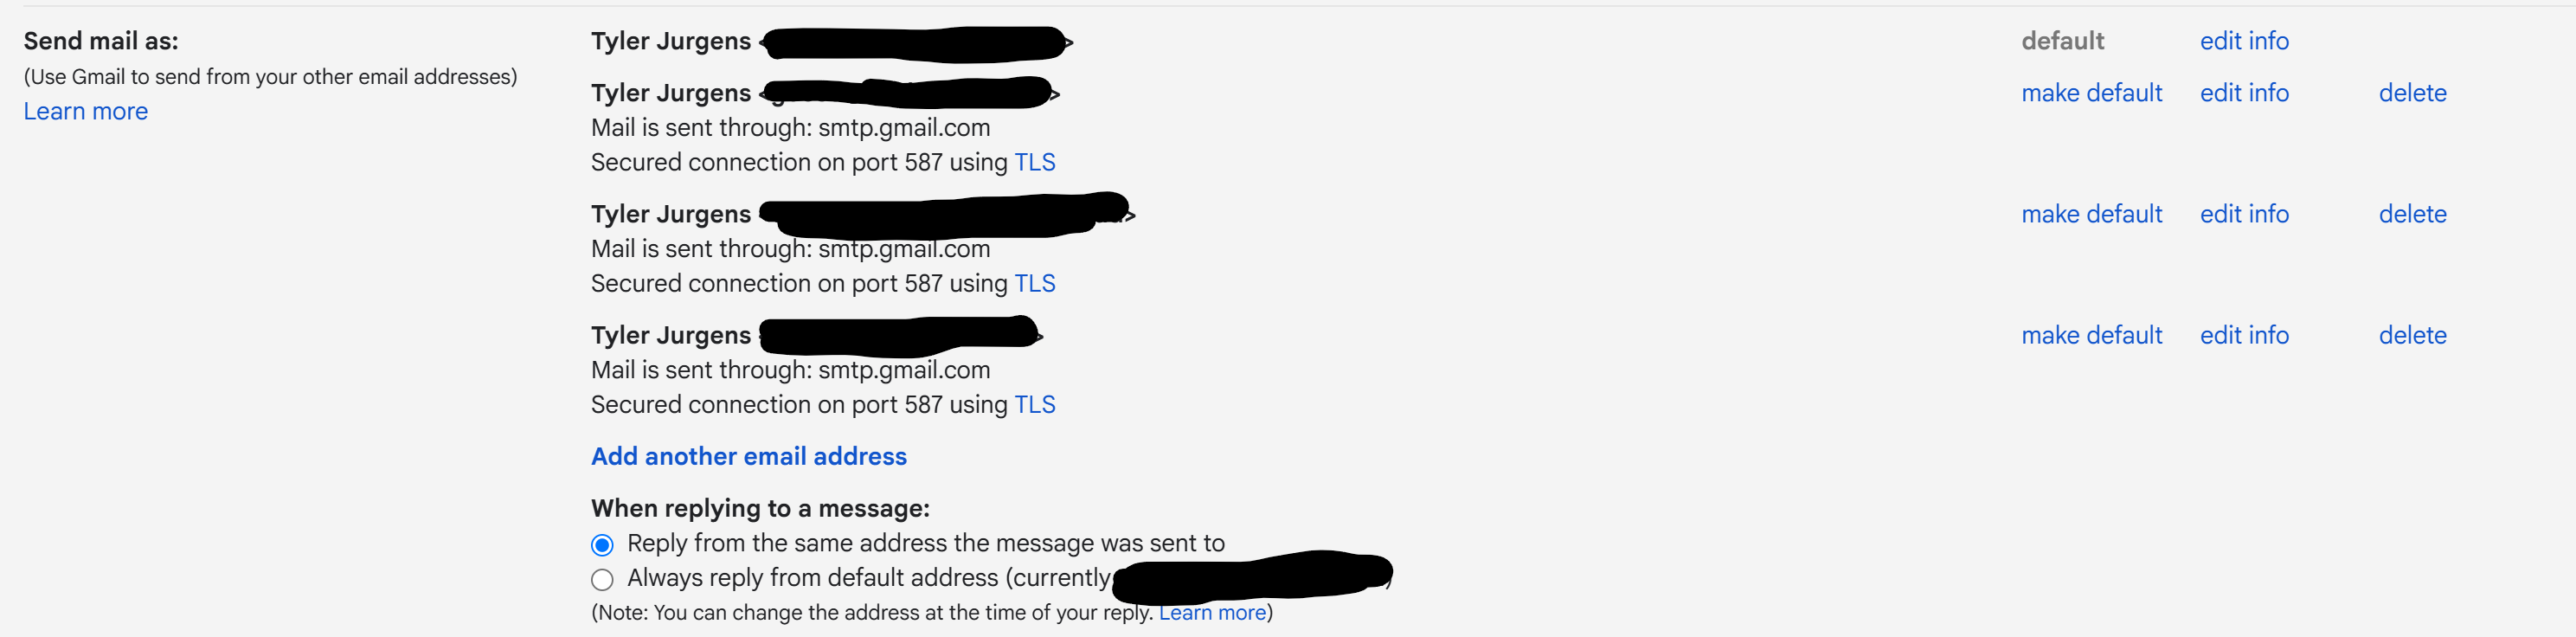
My Gmail configuration uses smtp.gmail.com over TLS on port 587 and replies from the same address that received the message.
You can also make the custom address the default From address for new messages. If you do, verify its reply-to setting too; Google notes that changing only the default From address does not automatically change where replies go.
Why Google SMTP Can Fail DMARC
This is where I could not find a way to get full DMARC alignment while using Gmail as the outbound server.
SPF and DKIM can both authenticate a message, but DMARC also requires the authenticated domain to align with the domain visible in the From header. Passing authentication for gmail.com is not the same thing as passing DMARC for yourdomain.com.
Cloudflare’s SPF and DKIM Records
The SPF and DKIM records Cloudflare adds are used by Email Routing when it forwards incoming mail. Leave them in place.
Do not assume that adding include:_spf.google.com to your domain’s SPF record fixes Gmail’s outbound alignment. In this consumer Gmail setup, the SMTP envelope and DKIM signature can use Google’s domain rather than your custom domain. That means the message can be authenticated by Google while still failing DMARC alignment for yourdomain.com.
So what can we do to resolve this?
Start DMARC in Monitoring Mode
If the domain does not already have DMARC, add one record at _dmarc:
v=DMARC1; p=none; rua=mailto:you@yourdomain.com
The policies mean:
p=none: Monitor and report without asking receivers to block mailp=quarantine: Ask receivers to treat failures as suspicious, often by placing them in spamp=reject: Ask receivers to reject failures
The rua address receives aggregate reports. These are usually machine-readable XML files and may be compressed, so they are not especially pleasant to read by hand.
Cloudflare DMARC Management can process those reports for you. When you enable it, Cloudflare scans for an existing DMARC record. If one exists, it adds its reporting address to the existing rua value; if one does not exist, Cloudflare offers to create a record.
Either way, make sure DNS contains exactly one DMARC record. If a lookup returns multiple records beginning with v=DMARC1, receivers stop DMARC policy discovery and do not apply the policy.
Do Not Tighten DMARC Yet
With this Gmail alias setup, I would leave DMARC at p=none unless testing shows that every legitimate sender for the domain passes alignment.
Sending a few test messages and looking only at whether they reached an inbox is not enough. Check the message headers or DMARC reports for the actual SPF, DKIM, and DMARC results. If Gmail is signing as gmail.com and using a Google envelope sender, neither result aligns with yourdomain.com.
If you want to move to p=quarantine or p=reject, use an outbound provider that authenticates and signs mail as your own domain first.
Option 2: Use SMTP2GO for SPF, DKIM, and DMARC
SMTP2GO’s free plan currently allows 1,000 messages per month and 200 per day, with no time limit on the plan. That is plenty for a personal address or a few homelab notifications.
The important part is to verify the sender domain, not just one sender address. SMTP2GO’s Verified Senders documentation notes that a single verified address uses one of its domains for SPF and DKIM. A verified sender domain lets it use DNS records under your domain instead, which provides the alignment DMARC needs.
Add and Verify the Sender Domain
In SMTP2GO, open Sending > Verified Senders > Sender domains, add yourdomain.com, and continue to the DNS configuration screen.
SMTP2GO generates the exact records for your account. They look similar to these:
CNAME  em123456                  return.smtp2go.net
CNAME  s123456._domainkey        dkim.smtp2go.net
CNAME  link                      track.smtp2go.net
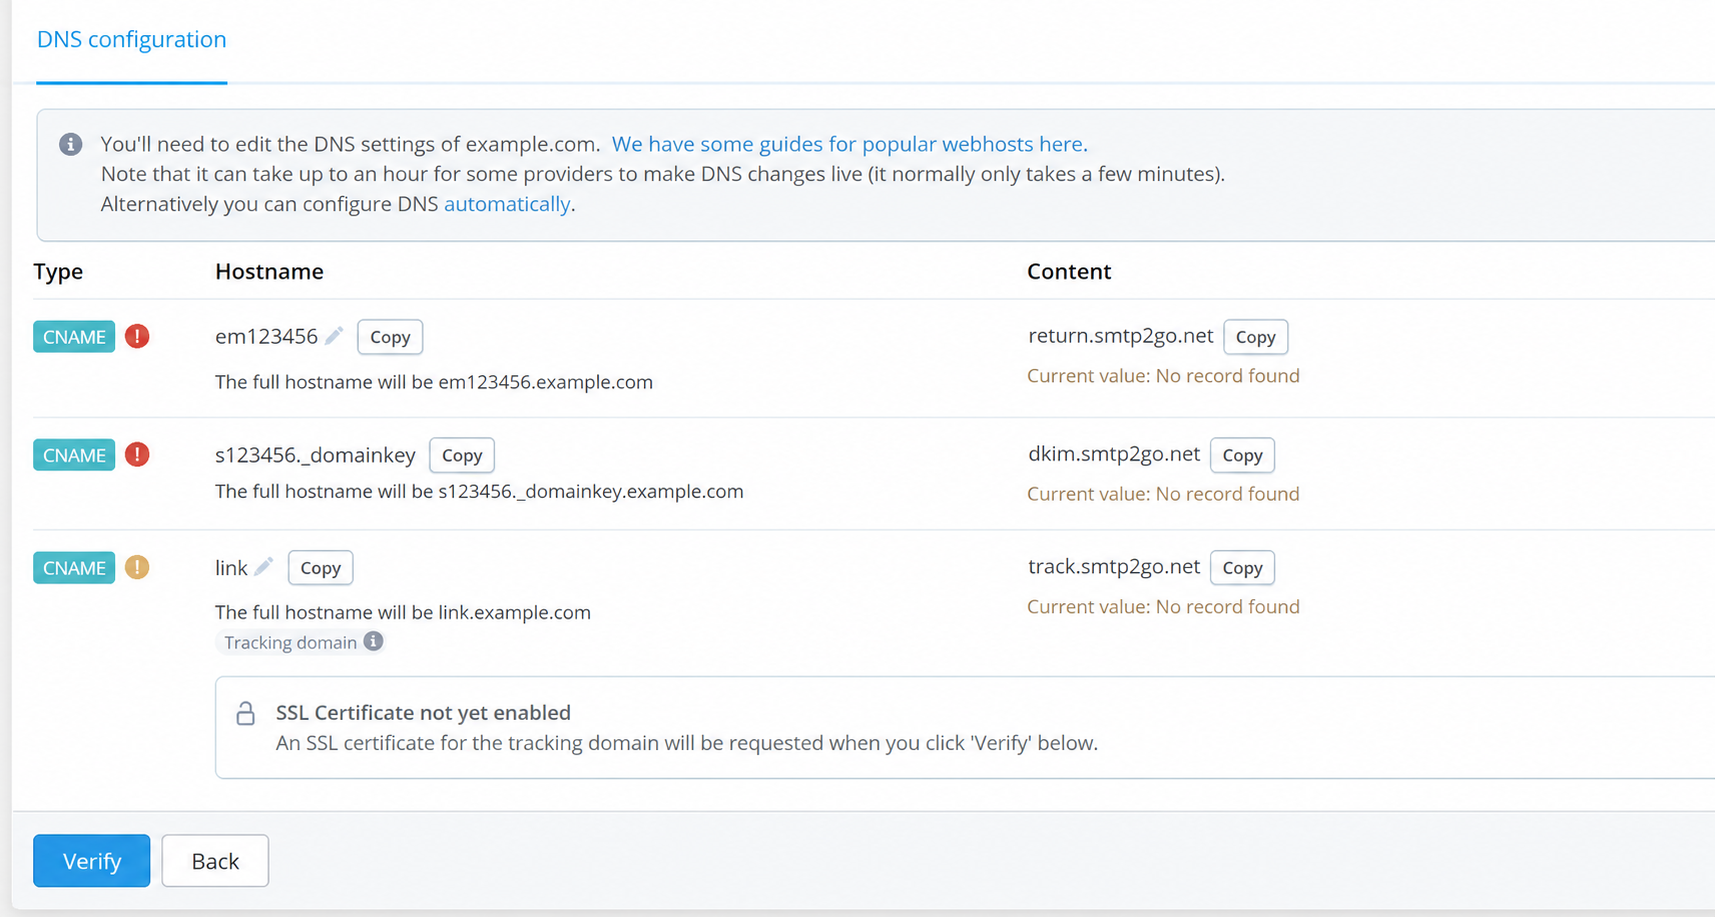
SMTP2GO generates account-specific hostnames. This screenshot uses sanitized example values; copy the exact records shown in your own account.
Add the records in Cloudflare DNS using the hostnames and targets SMTP2GO gives you. Keep each CNAME DNS only, not proxied. The link record is the custom tracking domain; SMTP2GO may present it separately from the two records required for aligned authentication.
Do not replace Cloudflare’s MX records. SMTP2GO is only handling outgoing mail, while Cloudflare still needs those MX records for incoming mail. SMTP2GO also says a verified sender domain does not require adding its provider to the root SPF TXT record: the generated return-path record handles SPF under your domain. That avoids creating a second SPF record or making the existing one more complicated.
Return to SMTP2GO and select Verify. DNS often updates within minutes. Cloudflare’s Auto TTL is five minutes, so changes usually show up quickly. If you are unsure, use one of the many free global DNS checkers to see what resolvers around the world are returning. Do not continue until the sender domain shows as verified.
Create an SMTP User
Open Sending > SMTP Users and create a username and password for Gmail. These credentials are separate from the password used to sign in to the SMTP2GO dashboard. SMTP2GO lists the available hosts and ports in its SMTP Settings documentation.
Use an SMTP user here, not an API key. API keys are for software that sends through SMTP2GO’s HTTP API; Gmail’s Send mail as feature uses normal SMTP authentication.
Use SMTP2GO with Gmail Send Mail As
Return to Gmail’s Settings > See all settings > Accounts and Import. Under Send mail as, add the custom address or edit the existing entry. If Gmail does not offer a way to change the outgoing server, remove that address and add it again.
On the SMTP screen, use:
SMTP server: mail.smtp2go.com
Port:        587
Username:    your SMTP2GO SMTP username
Password:    your SMTP2GO SMTP password
Security:    TLS
SMTP2GO also supports SSL on port 465, but its secure connections guidance recommends TLS when the client offers both. Gmail will send another confirmation message to the custom address; Cloudflare forwards it into the same Gmail inbox.
Leave Reply from the same address the message was sent to enabled. Gmail remains the interface for reading and composing mail; only the server carrying outbound messages has changed.
Verify SPF, DKIM, and DMARC in Gmail
Send a normal test message to an account at another provider. In Gmail, open the received message’s menu and choose Show original. Look for results like these:
SPF:   PASS
DKIM:  PASS with domain yourdomain.com
DMARC: PASS with header.from=yourdomain.com
The exact header formatting varies by receiver. What matters is that SPF or DKIM passes using a domain aligned with the visible From domain, allowing DMARC to pass. In my test, SMTP2GO used its generated return-path subdomain for aligned SPF and signed the message with DKIM as my own domain.
Authentication is not an inbox guarantee. A brand-new domain, new sender, minimal test content, recipient feedback, and shared-IP reputation can still influence spam filtering. My first one-line test went to spam, while a normal conversational message with the same passing authentication landed in the inbox.
Tighten DMARC Only After Testing
Once every legitimate service sending for the domain is authenticated and showing up correctly in DMARC reports, you can consider moving from p=none to p=quarantine, and eventually to p=reject.
Do not make that change just because one SMTP2GO test passed. Inventory every sender first, including website forms, monitoring tools, newsletters, and automated services. A stricter policy protects the domain from spoofing, but it can also block legitimate mail if you are sending from a system you forgot about.
Bonus: Use SMTP2GO for Veeam Notifications
One final bonus is that Veeam Backup & Replication can use this same SMTP2GO setup for its email notifications. VBR supports an authenticated SMTP server, so it can send job results from an address on the verified domain without involving Gmail’s outgoing server.
Veeam Backup & Replication -> SMTP2GO -> recipient
VBR sends directly to SMTP2GO. Gmail is not involved in the outbound path, and Cloudflare still only handles incoming mail. If you send the notification to an address on the custom domain, Cloudflare can forward it to Gmail like any other incoming message.
Create a separate SMTP2GO SMTP user for Veeam. SMTP2GO allows multiple SMTP users, and this keeps the VBR credentials separate from the credentials saved in Gmail.
In the VBR console:
- Open the main menu, select Options, and open the Email Settings tab.
- Enable email notifications and select SMTP server as the mail server.
- Enter
mail.smtp2go.comas the SMTP server. - Select Advanced, set the port to
587, enable Connect using SSL, and enable This SMTP server requires authentication. - Add the username and password from the SMTP2GO SMTP user created for Veeam.
- Set the From address to something like
veeam@yourdomain.com, using the domain already verified in SMTP2GO. - Add the recipient address, choose which results should send a notification, and select Test Message.
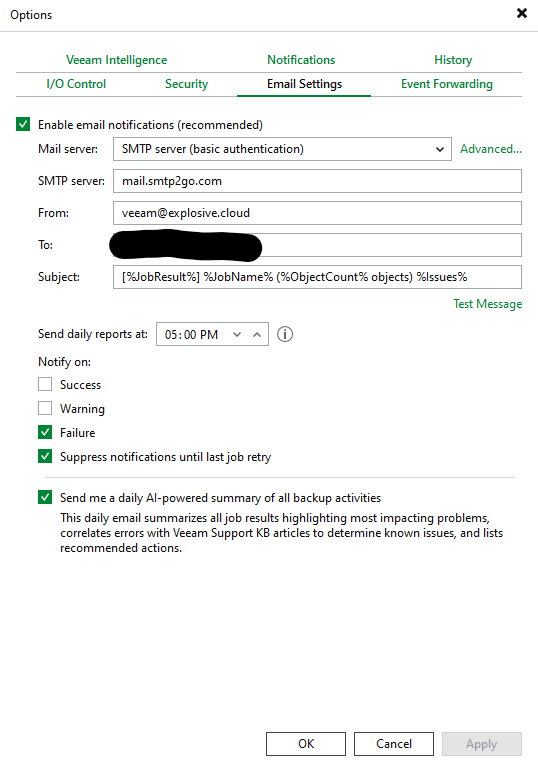
VBR configured to send email notifications through SMTP2GO. The recipient address is redacted.
Use port 587 here. Despite the wording of Veeam’s Connect using SSL option, this is the TLS/STARTTLS path supported by SMTP2GO. Veeam’s current documentation says implicit TLS on port 465 is not supported. The full field descriptions are in Veeam’s global email notification settings documentation.
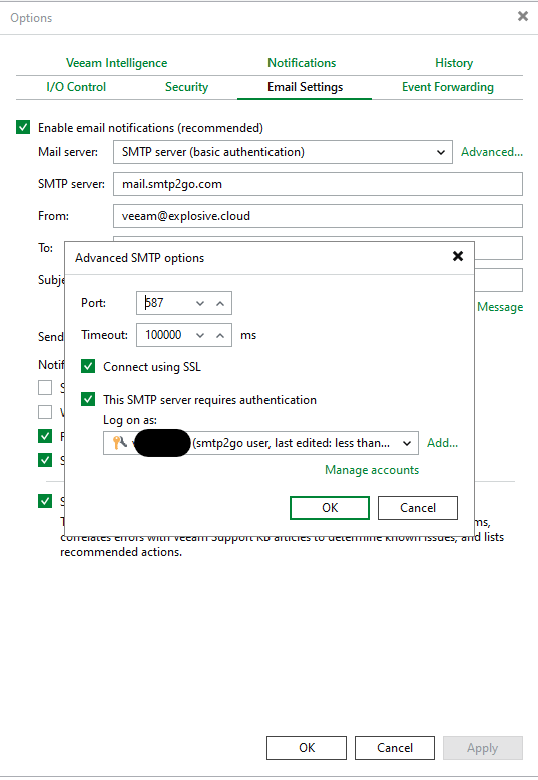
The Advanced SMTP Options use port 587 with encryption and authentication enabled. The SMTP username is redacted.
The From address does not need its own Cloudflare routing rule just to send. Add one if you want replies to that address delivered. Once the test message arrives, use Gmail’s Show original view again and confirm SPF, DKIM, and DMARC all pass.
VBR sends a notification after every job session by default. If you run a lot of jobs, keep SMTP2GO’s free limit of 1,000 messages per month and 200 per day in mind. In the example above, I enabled Failure and Suppress notifications until last job retry, so routine success messages and intermediate retries do not use up the allowance.
What This Setup Gives You
This setup works. So let’s recap and be clear about what we have achieved here.
Cloudflare Email Routing is forwarding, not a mailbox. Gmail stores the messages. Cloudflare does not give you a separate inbox or IMAP account.
Cloudflare Email Routing does not provide the outbound path used in this guide. Cloudflare now has a separate Email Sending service in beta, but sending to arbitrary recipients requires a Workers Paid plan. The two options here use Google SMTP or SMTP2GO instead.
Your Gmail address may be visible with the Google SMTP option. Some mail clients can display an “on behalf of” message, and Google lists a few cases where the original address can appear. A verified SMTP2GO domain avoids using the Gmail address as the envelope sender.
Strict DMARC enforcement is a poor fit for the Google SMTP option. Consumer Gmail does not give this custom domain its own aligned DKIM signature. SMTP2GO fixes alignment for mail sent through its verified domain, but you should not advertise a strict DMARC policy until every legitimate outbound source passes alignment.
SMTP2GO is still a relay, not a mailbox. The free plan has sending limits, short activity history, and shared delivery infrastructure. Cloudflare and Gmail continue to provide the incoming route and message storage.
Forwarding has its own authentication edge cases. Cloudflare now requires incoming messages to pass SPF or DKIM before it forwards them. That helps with abuse, but it can also reject mail from a sender that has not configured either protocol correctly.
How to Know When You’ve Outgrown This Setup
I like this setup for personal addresses, homelab alerts, domain-based signups, and small side projects. At low volume it costs nothing beyond the domain and keeps the mail in an inbox I already check.
I would switch when:
- I do not want my Gmail address exposed in any mail client
- I need a real mailbox with its own IMAP access
- I need more than SMTP2GO’s free sending allowance
- I need dedicated sending infrastructure or stronger delivery guarantees
- The address is important to a business and I do not want to depend on a forwarding workaround
For a complete mailbox, Fastmail, Google Workspace, Microsoft 365, and similar providers combine inbound storage with authenticated outbound sending. Amazon SES, Mailgun, and other transactional providers can provide aligned outbound delivery without becoming your mailbox. Their pricing and SMTP support vary, so check the current details before choosing one.
Zoho Mail also currently advertises a free custom-domain plan for up to five users in supported regions. That plan includes webmail and mobile apps, but not IMAP, POP, or ActiveSync.
Final Thoughts
Cloudflare Email Routing and Gmail make it surprisingly easy to use an address on your own domain without paying for another mailbox.
The incoming side is straightforward. The part worth a second look is outbound authentication. Google SMTP can put your custom address in the From field, but that does not automatically give your domain aligned SPF or DKIM.
For a personal address or homelab use, that tradeoff may be completely fine. If you want DMARC alignment without paying for a mailbox, adding a verified SMTP2GO domain gives Gmail an authenticated outbound path while Cloudflare continues handling incoming mail.
Whichever option you choose, inspect the actual authentication results instead of assuming that a message reaching the inbox means everything passed. Start DMARC in monitoring mode, review every legitimate sender, and only tighten the policy when the evidence supports it.
Disclaimer: As of July 2026, there is no additional charge for the setup in this post at low sending volumes. You still need to own the domain, and any provider could change its features or pricing later.